Categories
Network

DNSSEC with named

Faster entropy

after haveged is installed /proc/sys/kernel/random/entropy_avail should return something above 1000.

yum install -y epel-release
yum install -y rng-tools haveged
systemctl enable haveged.service
systemctl start haveged.service
systemctl status haveged.service
cat /proc/sys/kernel/random/entropy_avail
cat /dev/random | rngtest -c 1000

Source: NixCraft

Categories
pfSense

PfSense does not boot without a monitor because of serial ports

Shuttle DS77u, DS67u and DS57u has problem booting without a monitor then upgrading from PfSense 2.3 to 2.4. These devices ran Legacy bios and not UEFI (UEFI is a new feature in PfSense 2.4) but never booted if the sceen was disconnected at power on, and never initialized the screen if plugged in after power on. This was because the serial ports were enabled in bios.

Bleupomme on PfSense Forum had the answer.


This just happened to me too on a shuttle XPC:
– Updated the BIOS, but this did not solve the problem
– Brute forced BIOS settings
-> by disabling the Serial ports the computer boots normally

Does pfsense 2.4 default to Serial and wait for some sort of connection when there is no monitor?

Categories
Network

Configure Postfix

This these guides configure your postfix so its forwards all local mails to an external server using authentication.

Categories
Network Unifi

Ubiquiti Unifi

Adding device in another subnet

If your controller is not in the same subnet as the device you want to add, you must use a computer in this subnet as a 3rd party.

  1. Install Ubiquiti Device Discovery Tool in Chrome
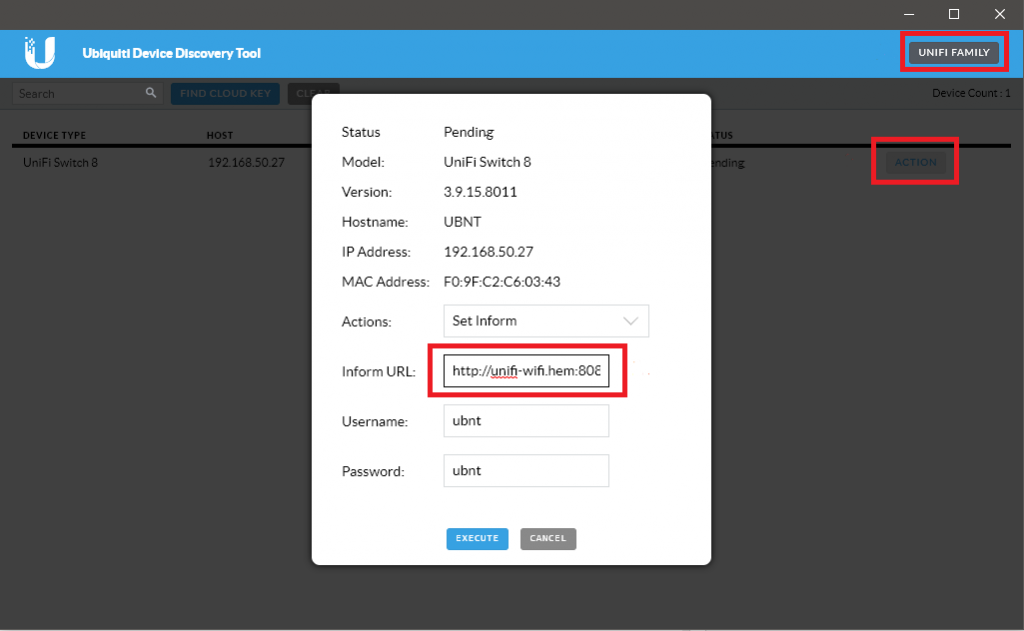
  2. Press the UNIFI FAMILY button in the right top corner to se UniFi devices in the network.
  3. Press ACTION on the device you want to add
  4. Change the Inform URL to match your controller url is http://yourcontroller:8080/inform. Username and password is for the device, default is ubnt/ubnt
  5. Go to you Unifi Controller, Access the first/top site, list devices and ADOPT your device.
  6. Return to Ubiquiti Device Discovery Tool press action and send another Set Inform while the controller is adopting. Your device should be provisioned


Your Device should now be provisioned

Factory Reset

Before reseting device, make sure you forget the device in the UniFi controller first.

To restore an UniFi product press and hold the reset button for five seconds. just pressing the reset button will restart the unit.

Categories
Network Storage

Howto setup NFSv4

Setup NFSv4 Server

Below is how the openMediaVault is configured, the interesting part is fsid=0, instead of connecting to /export/nextcloud as we do in NFSv3 we are going to connect directly to /nextcloud
[code language=”bash”]
GNU nano 2.2.6 File: /etc/exports
# This configuration file is auto-generated.
/export/nextcloud 192.168.64.201/32(fsid=1,rw,subtree_check,secure,crossmnt,anonuid=1002,anongid=1002)
/export/UniFi-Video 192.168.64.147/32(fsid=2,rw,subtree_check,secure,crossmnt)
# NFSv4 – pseudo filesystem root
/export 192.168.64.201/32(ro,fsid=0,root_squash,no_subtree_check,hide)
/export 192.168.64.147/32(ro,fsid=0,root_squash,no_subtree_check,hide)
[/code]


fsid=0:
NFS server needs to be able to identify each filesystem that it exports. For NFSv4 server, there is a distinguished filesystem which is the root of all exported filesystem. This is specified with fsid=root or fsid=0 both of which mean exactly the same thing.

Debian / Ubuntu Linux: Setup NFSv4 File Server

Client setup

To connect with NFSv4 instead of NFSv3 we need to use nfs4 instead of nfs as a filesystem. As stated above, we omitt the /export/ part we usally use with NFSv3
[code language=”bash”]
GNU nano 2.2.6 File: /etc/fstab

192.168.64.200:/nextcloud /host/nfs/nextcloud nfs4 rsize=8192,wsize=8192,timeo=14,intr 0 0

[/code]

Categories
Network

NFS and iptables

If you are using NFSv4 (which is likely) you only need to open one port in your firewall port 2049/TCP. The examples below are done on an OpenMediaVault/Debian server to allow NFS access but nothing else from network 192.168.64.144/28 and 192.168.64.192/26.

Categories
Linux Network

Linux DHCP renew

howto renew your DHCP lease without restarting your network interface. First release your current lease and then request a new for interface eth0.

[code language=”bash”]
dhclient -r eth0
dhclient eth0
[/code]

Categories
Network Virtualization

OpenMediaVault / Debian network configuration for bonding/lacp and vlan

This is an example of an network configuration on my OpenMediaVault server. It takes two network interfaces (eth3 and rename3) and bonds them together using LACP. On top off this bond i have created three bridges. br1 witch is for untagged traffic and. br641 and 642 for vlan tagged traffic on vlan 641 and 642 respectively. br1/br641/br642 are all attached to the host and is configured for dhcp. they can also be attached to virtual machines.

Categories
Network Windows

VNC with INTEL AMT

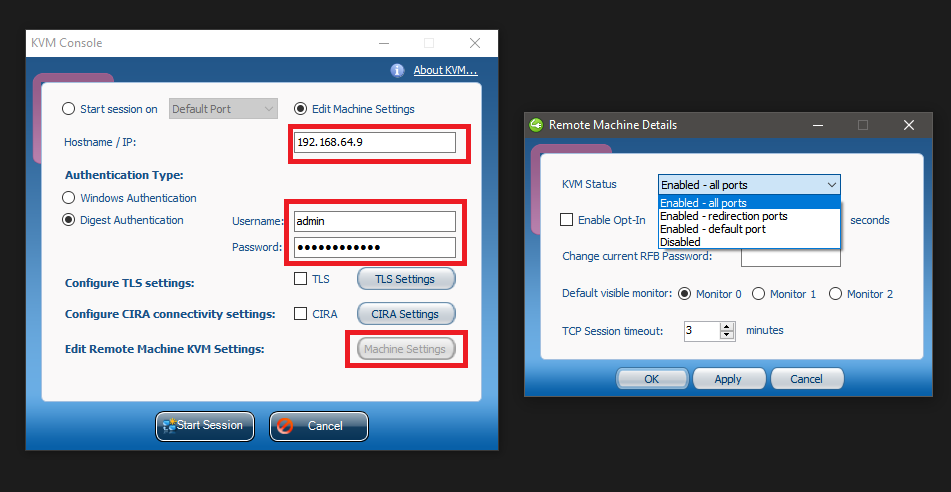
To allow tightVNC and UltraVNC connect to your AMT machine you need change redirection ports to all ports. you can to this from remote using Intel AMT SDK You will be promptet do add an rfb (vnc) password.

If you get a black/no screen then using TightVNC/UltraVNC you need to update your AMT Firmware on the motherboard.

Categories
Network pfSense

Full use of OpenDNS with pfSense

These steeps will show you how to use OpenDNS instead of your ISPs DNS in pfSense, and how to setup a free home account at OpenDNS to start filtering DNS request, and by that blocking unwanted traffic.