Categories
Linux

Installing nginx in CentOS 8

Copy paste code to install newest nginx from nginx.org on CentOS 8. Read more at http://nginx.org/en/linux_packages.html#RHEL-CentOS

sudo yum install yum-utils

cat <<EOF > /etc/yum.repos.d/nginx.repo

[nginx-stable]
name=nginx stable repo
baseurl=http://nginx.org/packages/centos/\$releasever/\$basearch/
gpgcheck=1
enabled=1
gpgkey=https://nginx.org/keys/nginx_signing.key
module_hotfixes=true

[nginx-mainline]
name=nginx mainline repo
baseurl=http://nginx.org/packages/mainline/centos/\$releasever/\$basearch/
gpgcheck=1
enabled=0
gpgkey=https://nginx.org/keys/nginx_signing.key
module_hotfixes=true

EOF

sudo yum install nginx
Categories
Linux

Error unpacking rpm package chkconfig

Trying to update some CentOS servers to in this case CentOS 7.4 i stumbled onto a problem there it was not possible to perform a update on chkconfig.

[root@moln.dalesjo.net ~]# yum update -y
Loaded plugins: fastestmirror
Loading mirror speeds from cached hostfile
 * base: mirror.zetup.net
 * epel: mirror.zetup.net
 * extras: mirror.zetup.net
 * updates: mirror.zetup.net
Resolving Dependencies
--> Running transaction check
---> Package chkconfig.x86_64 0:1.7.2-1.el7 will be updated
---> Package chkconfig.x86_64 0:1.7.4-1.el7 will be an update
--> Finished Dependency Resolution

Dependencies Resolved

====================================================================================================================================================================================================================================================
 Package Arch Version Repository Size
====================================================================================================================================================================================================================================================
Updating:
 chkconfig x86_64 1.7.4-1.el7 base 181 k

Transaction Summary
====================================================================================================================================================================================================================================================
Upgrade 1 Package

Total download size: 181 k
Downloading packages:
Delta RPMs disabled because /usr/bin/applydeltarpm not installed.
chkconfig-1.7.4-1.el7.x86_64.rpm | 181 kB 00:00:00
Running transaction check
Running transaction test
Transaction test succeeded
Running transaction
 Updating : chkconfig-1.7.4-1.el7.x86_64 1/2
Error unpacking rpm package chkconfig-1.7.4-1.el7.x86_64
error: unpacking of archive failed on file /etc/init.d: cpio: rename
chkconfig-1.7.2-1.el7.x86_64 was supposed to be removed but is not!
 Verifying : chkconfig-1.7.2-1.el7.x86_64 1/2
 Verifying : chkconfig-1.7.4-1.el7.x86_64 2/2

Failed:
 chkconfig.x86_64 0:1.7.2-1.el7 chkconfig.x86_64 0:1.7.4-1.el7

Complete!

The problem occured because /etc/init.d was a directory instead of a softlink to /etc/rc.d/init.d/. To fix it, simply do

mv /etc/init.d/* /etc/rc.d/init.d/
rm /etc/init.d -r
ln -s /etc/rc.d/init.d/ /etc/init.d
Categories
Linux Storage

Extended permissions on backup directory

Using rsnapshot to do backups I want to enable some users the availability to easily restore a single file from the snapshot. Problem is that rsnapshot also is keeping the original permissions for each file. To solve this i will create a usergroup called dalesjo-backup and give this group read access to all files in the backup using an Access Control list.

Enable ACL

First you need to enable ACL on your zfs pool in this case zfs-pool-2

zfs set acltype=posixacl zfs-pool-2

If you dont do this setfacl will return the error below.

setfacl: .: Operation not supported

Set Filepermissions

Below I’m setting a default acl giving dalesjo-backup read/execute permissions on all new files. And after that changing all currently existing files to give read/execute access to the same group.

cd /zfs-pool-2/backup
setfacl -Rdm "g:dalesjo-backup:rx" .
setfacl -Rm "g:dalesjo-backup:rx" .
getfacl .

Source: Serverfault

Categories
Linux Network

Extending snmpd with sensor data from ipmitool

Create script

Create a script that returns the data you want to monitor through snmp. the output should be cleaned from whitespaces.

My examples monitor sensor data from ipmi by creating cron script that outputs ipmitool sensor data to  a temp file every two minutes. And then parsing it with snmp_ipmi from github. Cron script below.

# .--------------------------- minute (0 - 59)
# | .------------- hour (0 - 23)
# | | .---------- day of month (1 - 31)
# | | | .------- month (1 - 12) OR jan,feb,mar,apr ...
# | | | | .---- day of week (0 - 6) (Sunday=0 or 7) OR sun,mon,tue,wed,thu,fri,sat
# | | | | |
# * * * * * user-name command to be executed
 */2 * * * * root ipmitool sensor list > /tmp/ipmi_sensor_list

Add script to snmpd

Edit /etc/snmp/snmpd.conf and add your scripts

rouser OP5View

extend "System Fan 1" /usr/lib64/nagios/plugins/custom/ipmi/snmp_ipmi -f /tmp/ipmi_sensor_list -u "System Fan 1"
extend "System Fan 3" /usr/lib64/nagios/plugins/custom/ipmi/snmp_ipmi -f /tmp/ipmi_sensor_list -u "System Fan 3"
extend "System Fan 4" /usr/lib64/nagios/plugins/custom/ipmi/snmp_ipmi -f /tmp/ipmi_sensor_list -u "System Fan 4"

Test

restart snmpd and run the following command to see your snmp data. example output below.

# snmpwalk -u OP5View -A password -a SHA -X encryptionkey -x AES -l authPriv -v3 localhost .1.3.6.1.4.1.8072.1.3
NET-SNMP-EXTEND-MIB::nsExtendNumEntries.0 = INTEGER: 4
NET-SNMP-EXTEND-MIB::nsExtendCommand."test" = STRING: /bin/echo
NET-SNMP-EXTEND-MIB::nsExtendCommand."System Fan 1" = STRING: /usr/lib64/nagios/plugins/custom/ipmi/snmp_ipmi
NET-SNMP-EXTEND-MIB::nsExtendCommand."System Fan 3" = STRING: /usr/lib64/nagios/plugins/custom/ipmi/snmp_ipmi
NET-SNMP-EXTEND-MIB::nsExtendCommand."System Fan 4" = STRING: /usr/lib64/nagios/plugins/custom/ipmi/snmp_ipmi
NET-SNMP-EXTEND-MIB::nsExtendArgs."test" = STRING: hello
NET-SNMP-EXTEND-MIB::nsExtendArgs."System Fan 1" = STRING: -f /tmp/ipmi_sensor_list -u \"System Fan 1\"
NET-SNMP-EXTEND-MIB::nsExtendArgs."System Fan 3" = STRING: -f /tmp/ipmi_sensor_list -u \"System Fan 3\"
NET-SNMP-EXTEND-MIB::nsExtendArgs."System Fan 4" = STRING: -f /tmp/ipmi_sensor_list -u \"System Fan 4\"
NET-SNMP-EXTEND-MIB::nsExtendInput."test" = STRING:
NET-SNMP-EXTEND-MIB::nsExtendInput."System Fan 1" = STRING:
NET-SNMP-EXTEND-MIB::nsExtendInput."System Fan 3" = STRING:
NET-SNMP-EXTEND-MIB::nsExtendInput."System Fan 4" = STRING:
NET-SNMP-EXTEND-MIB::nsExtendCacheTime."test" = INTEGER: 5
NET-SNMP-EXTEND-MIB::nsExtendCacheTime."System Fan 1" = INTEGER: 5
NET-SNMP-EXTEND-MIB::nsExtendCacheTime."System Fan 3" = INTEGER: 5
NET-SNMP-EXTEND-MIB::nsExtendCacheTime."System Fan 4" = INTEGER: 5
NET-SNMP-EXTEND-MIB::nsExtendExecType."test" = INTEGER: exec(1)
NET-SNMP-EXTEND-MIB::nsExtendExecType."System Fan 1" = INTEGER: exec(1)
NET-SNMP-EXTEND-MIB::nsExtendExecType."System Fan 3" = INTEGER: exec(1)
NET-SNMP-EXTEND-MIB::nsExtendExecType."System Fan 4" = INTEGER: exec(1)
NET-SNMP-EXTEND-MIB::nsExtendRunType."test" = INTEGER: run-on-read(1)
NET-SNMP-EXTEND-MIB::nsExtendRunType."System Fan 1" = INTEGER: run-on-read(1)
NET-SNMP-EXTEND-MIB::nsExtendRunType."System Fan 3" = INTEGER: run-on-read(1)
NET-SNMP-EXTEND-MIB::nsExtendRunType."System Fan 4" = INTEGER: run-on-read(1)
NET-SNMP-EXTEND-MIB::nsExtendStorage."test" = INTEGER: permanent(4)
NET-SNMP-EXTEND-MIB::nsExtendStorage."System Fan 1" = INTEGER: permanent(4)
NET-SNMP-EXTEND-MIB::nsExtendStorage."System Fan 3" = INTEGER: permanent(4)
NET-SNMP-EXTEND-MIB::nsExtendStorage."System Fan 4" = INTEGER: permanent(4)
NET-SNMP-EXTEND-MIB::nsExtendStatus."test" = INTEGER: active(1)
NET-SNMP-EXTEND-MIB::nsExtendStatus."System Fan 1" = INTEGER: active(1)
NET-SNMP-EXTEND-MIB::nsExtendStatus."System Fan 3" = INTEGER: active(1)
NET-SNMP-EXTEND-MIB::nsExtendStatus."System Fan 4" = INTEGER: active(1)
NET-SNMP-EXTEND-MIB::nsExtendOutput1Line."test" = STRING: hello
NET-SNMP-EXTEND-MIB::nsExtendOutput1Line."System Fan 1" = STRING: 1274.000
NET-SNMP-EXTEND-MIB::nsExtendOutput1Line."System Fan 3" = STRING: 1372.000
NET-SNMP-EXTEND-MIB::nsExtendOutput1Line."System Fan 4" = STRING: 1372.000
NET-SNMP-EXTEND-MIB::nsExtendOutputFull."test" = STRING: hello
NET-SNMP-EXTEND-MIB::nsExtendOutputFull."System Fan 1" = STRING: 1274.000
NET-SNMP-EXTEND-MIB::nsExtendOutputFull."System Fan 3" = STRING: 1372.000
NET-SNMP-EXTEND-MIB::nsExtendOutputFull."System Fan 4" = STRING: 1372.000
NET-SNMP-EXTEND-MIB::nsExtendOutNumLines."test" = INTEGER: 1
NET-SNMP-EXTEND-MIB::nsExtendOutNumLines."System Fan 1" = INTEGER: 1
NET-SNMP-EXTEND-MIB::nsExtendOutNumLines."System Fan 3" = INTEGER: 1
NET-SNMP-EXTEND-MIB::nsExtendOutNumLines."System Fan 4" = INTEGER: 1
NET-SNMP-EXTEND-MIB::nsExtendResult."test" = INTEGER: 0
NET-SNMP-EXTEND-MIB::nsExtendResult."System Fan 1" = INTEGER: 0
NET-SNMP-EXTEND-MIB::nsExtendResult."System Fan 3" = INTEGER: 0
NET-SNMP-EXTEND-MIB::nsExtendResult."System Fan 4" = INTEGER: 0
NET-SNMP-EXTEND-MIB::nsExtendOutLine."test".1 = STRING: hello
NET-SNMP-EXTEND-MIB::nsExtendOutLine."System Fan 1".1 = STRING: 1274.000
NET-SNMP-EXTEND-MIB::nsExtendOutLine."System Fan 3".1 = STRING: 1372.000
NET-SNMP-EXTEND-MIB::nsExtendOutLine."System Fan 4".1 = STRING: 1372.000

Get OID

Get you oid so you can search from another computer without MIB

snmptranslate -On 'NET-SNMP-EXTEND-MIB::nsExtendOutput1Line."System Fan 1"'

Nagios / OP5 Test

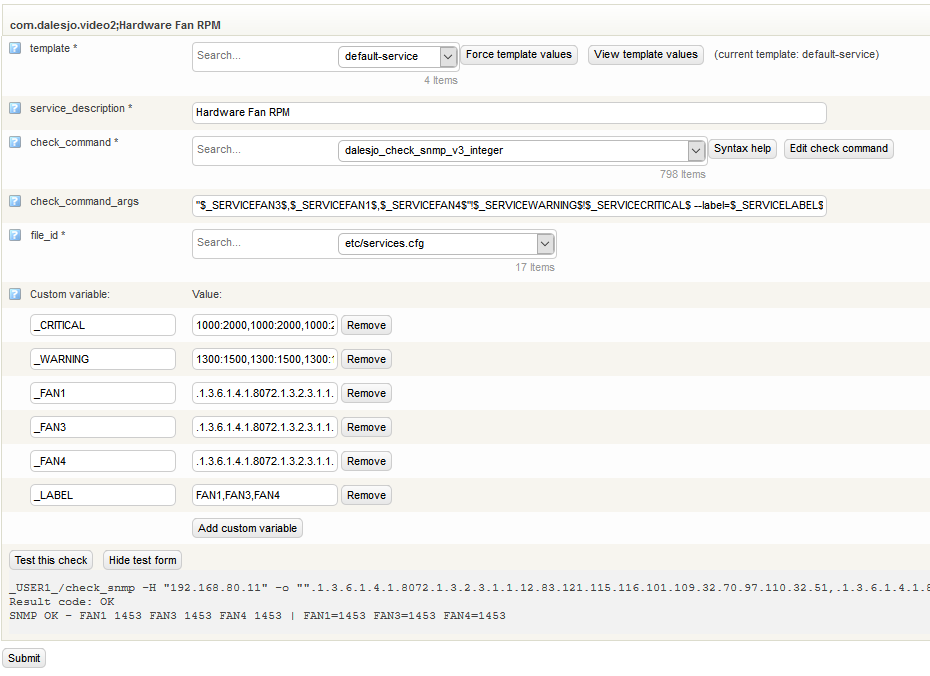
Setup a snmp test in Nagios/OP5 using check_snmp. because the output from the script is strings check_snmp has to do string conversion to integer, which it can if you configure it correctly. The example below does one check_snmp request it returns the value for all 3 fans we configured above. if any of the 3 Fans RPM value is outside of 1300-1500 rpm a warning is generated, if the rpm value is outside of 1000-2000 a critical is generated.

_USER1_/check_snmp -H "192.168.80.11" -o "".1.3.6.1.4.1.8072.1.3.2.3.1.1.12.83.121.115.116.101.109.32.70.97.110.32.51,.1.3.6.1.4.1.8072.1.3.2.3.1.1.12.83.121.115.116.101.109.32.70.97.110.32.49,.1.3.6.1.4.1.8072.1.3.2.3.1.1.12.83.121.115.116.101.109.32.70.97.110.32.52"" -P 3 -U "OP5View " -a sha -A "password " -x aes -X "encryptionkey " -L authPriv -w 1300:1500,1300:1500,1300:1500 -c 1000:2000,1000:2000,1000:2000 --label=FAN1,FAN3,FAN4
Result code: OK
SNMP OK - FAN1 1453 FAN3 1453 FAN4 1453 | FAN1=1453 FAN3=1453 FAN4=1453

How it looks in OP5

Categories
Network

Enable IPMI from Linux

Install ipmitool
yum install ipmitool -y
Show Firmware
ipmitool mc info
Show Network
ipmitool lan print 1
Configure first network card (usally default) with static iP-number
ipmitool lan set 1 ipsrc static
ipmitool lan set 1 ipaddr 192.168.61.119
ipmitool lan set 1 netmask 255.255.255.0
ipmitool lan set 1 defgw ipaddr 192.168.61.1
Configure second network with DHCP
ipmitool lan set 2 ipsrc dhcp
Set SNMP community
ipmitool lan set 1 snmp dalesjo
List users
ipmitool user list 1
Change password on second user in list
ipmitool user set password 2
List Sensors
ipmitool sdr list
Restart IPMI
ipmitool mc reset
Sources

http://www.openfusion.net/linux/ipmi_on_centos

https://discuss.pivotal.io/hc/en-us/articles/206396927-How-to-work-on-IPMI-and-IPMITOOL

Categories
Windows

CIFS/Smbclient speed

By default the linux smbclient mounts smb shares using smb protocol version 1.0 (now deprecated). resulting in slow transfer speed against Windows 10 shares. by adding vers=3.0 to you mount options you are using smb protocol version 3.0 with greater speed.

mount -t cifs //192.168.60.202/föreningar "/mnt/share/radion/k2/foreningar" --verbose -o username=backup,password=mypassword,vers=3.0

More info in this stackexchange thread about cifs randomly losing connection to windows share

Categories
Linux

Uninstall compiled software

When uninstalling software you compiled yourself you can run make -n install to see what the make install command did. For Nginx you only had to remove /sbin/nginx before installning NginX from YUM.

# make -n install
make -f objs/Makefile install
make[1]: Entering directory `/root/install/cache/nginx-1.9.9'
test -d '/' || mkdir -p '/'
test ! -f '/sbin' || mv '/sbin' '/sbin.old'
cp objs/nginx '/sbin'
test -d '/etc/nginx' || mkdir -p '/etc/nginx'
cp conf/koi-win '/etc/nginx'
cp conf/koi-utf '/etc/nginx'
cp conf/win-utf '/etc/nginx'
test -f '/etc/nginx/mime.types' || cp conf/mime.types '/etc/nginx'
cp conf/mime.types '/etc/nginx/mime.types.default'
test -f '/etc/nginx/fastcgi_params' || cp conf/fastcgi_params '/etc/nginx'
cp conf/fastcgi_params '/etc/nginx/fastcgi_params.default'
test -f '/etc/nginx/fastcgi.conf' || cp conf/fastcgi.conf '/etc/nginx'
cp conf/fastcgi.conf '/etc/nginx/fastcgi.conf.default'
test -f '/etc/nginx/uwsgi_params' || cp conf/uwsgi_params '/etc/nginx'
cp conf/uwsgi_params '/etc/nginx/uwsgi_params.default'
test -f '/etc/nginx/scgi_params' || cp conf/scgi_params '/etc/nginx'
cp conf/scgi_params '/etc/nginx/scgi_params.default'
test -f '/etc/nginx/nginx.conf' || cp conf/nginx.conf '/etc/nginx/nginx.conf'
cp conf/nginx.conf '/etc/nginx/nginx.conf.default'
test -d '/var/run/nginx' || mkdir -p '/var/run/nginx'
test -d '/var/log/nginx/access' || mkdir -p '/var/log/nginx/access'
test -d '//html' || cp -R html '/'
test -d '/var/log/nginx/errors' || mkdir -p '/var/log/nginx/errors'
make[1]: Leaving directory `/root/install/cache/nginx-1.9.9'

Source

Javier Rivera on askubuntu

Categories
Network Storage

Howto setup NFSv4

Setup NFSv4 Server

Below is how the openMediaVault is configured, the interesting part is fsid=0, instead of connecting to /export/nextcloud as we do in NFSv3 we are going to connect directly to /nextcloud
[code language=”bash”]
GNU nano 2.2.6 File: /etc/exports
# This configuration file is auto-generated.
/export/nextcloud 192.168.64.201/32(fsid=1,rw,subtree_check,secure,crossmnt,anonuid=1002,anongid=1002)
/export/UniFi-Video 192.168.64.147/32(fsid=2,rw,subtree_check,secure,crossmnt)
# NFSv4 – pseudo filesystem root
/export 192.168.64.201/32(ro,fsid=0,root_squash,no_subtree_check,hide)
/export 192.168.64.147/32(ro,fsid=0,root_squash,no_subtree_check,hide)
[/code]


fsid=0:
NFS server needs to be able to identify each filesystem that it exports. For NFSv4 server, there is a distinguished filesystem which is the root of all exported filesystem. This is specified with fsid=root or fsid=0 both of which mean exactly the same thing.

Debian / Ubuntu Linux: Setup NFSv4 File Server

Client setup

To connect with NFSv4 instead of NFSv3 we need to use nfs4 instead of nfs as a filesystem. As stated above, we omitt the /export/ part we usally use with NFSv3
[code language=”bash”]
GNU nano 2.2.6 File: /etc/fstab

192.168.64.200:/nextcloud /host/nfs/nextcloud nfs4 rsize=8192,wsize=8192,timeo=14,intr 0 0

[/code]

Categories
Network

NFS and iptables

If you are using NFSv4 (which is likely) you only need to open one port in your firewall port 2049/TCP. The examples below are done on an OpenMediaVault/Debian server to allow NFS access but nothing else from network 192.168.64.144/28 and 192.168.64.192/26.

Categories
Storage

Write performance ZFS

Quick test to measure write performance off two ZFS pools using Raid2z on Linux

Hardware for testbench