Categories
Linux

RabbitMQ Memory Limit

RabbitMQ has an memory limit, then RabbitMQ hits this limit weird things starts to happen. Example The .NET library for RabbitMQ Client hangs then you try to dispose the connection.

How do you know that RabbitMQ has run out of memory? you have to check the RabbitMQ node (picture below)

Then Memory is read you are out of memory

RabbitMQ will not allocate all available memory in the VM or container you have set up.

High memory watermark blocks publishers and prevents new messages from being enqueued. Since garbage collection can double the memory used by a queue, it is unsafe to set the high memory watermark above 0.5. The default high memory watermark is set to 0.4 since this is safer as not all memory is used by queues. This is entirely workload specific, which differs across RabbitMQ deployments.

https://www.rabbitmq.com/memory-use.html

A freshly started RabbitMQ uses roughly 100MB, that means that you cannot limit your container to less than 250MB of memory if you want your RabbitMQ to actually be useable

Categories
Linux Network

Test Unix socket

This is a small test/benchmark to se if the use of a unix domain socket in Nginx would affect performance in any significant way for an api

The api is hosted by .NET Core and containerized. Test is done by using apache benchmark. doing 100 concurrent request 50 times. The request that is done has a payload of 1,7 KB.

ab -n 5000 -c 100 "http://localhost/v3/api/"

Result

This is the average request per second after 10 tests against each configuration.

Requests per second
HTTP100
HTTP (Keepalive enabled)118
Unix Socket98
Unix Socket (Keepalive enabled)120

Keepalive

Nginx option keepalive has an impact on both http and unix sockets. It looks to be far more important than the actual connection type.

upstream backend {
        keepalive 100;
        server 10.265.44.3:8080;
}

Categories
Linux

Podman 1.8

Guide to install a newer version of Podman on Centos can be found on podmans website https://podman.io/getting-started/installation.html This will get you a newer version than 1.4 which is included in the default yum repository.

CentOS 7 is using an older kernel that does not support all features of podman. One thing is that needs to be removed is mount options with metacopy. You can change this line by removing metacopy=on in
/etc/containers/storage.conf 

mountopt = "nodev,metacopy=on"

If you do not do this you will get an error then trying to use podman, as the one below.

[root@dalesjo.com podman]# podman ps -a
Error: error creating libpod runtime: failed to mount overlay for metacopy check: invalid argument

Source: https://github.com/containers/libpod/issues/3560

Categories
Linux

Installing nginx in CentOS 8

Copy paste code to install newest nginx from nginx.org on CentOS 8. Read more at http://nginx.org/en/linux_packages.html#RHEL-CentOS

sudo yum install yum-utils

cat <<EOF > /etc/yum.repos.d/nginx.repo

[nginx-stable]
name=nginx stable repo
baseurl=http://nginx.org/packages/centos/\$releasever/\$basearch/
gpgcheck=1
enabled=1
gpgkey=https://nginx.org/keys/nginx_signing.key
module_hotfixes=true

[nginx-mainline]
name=nginx mainline repo
baseurl=http://nginx.org/packages/mainline/centos/\$releasever/\$basearch/
gpgcheck=1
enabled=0
gpgkey=https://nginx.org/keys/nginx_signing.key
module_hotfixes=true

EOF

sudo yum install nginx
Categories
Linux

Podman/Docker cant reach internet

Had problem on CentOS 7/8 with both podman and docker. no container could reach internet. needed to enable the following.

cat <<EOF > /etc/sysctl.d/podman.conf
# Enable containers to access the outer world
net.ipv4.ip_forward=1
EOF

I also needed to enable masquerading on the external zone.

firewall-cmd --zone=public --add-masquerade
firewall-cmd --permanent --zone=public --add-masquerade

One question left, who is allowed to masquerade? i see no filtering done meaning any other network connected to this machine can masquerade as the public zone. Does not sound good.

Categories
Linux Uncategorized

Icinga/Nagios test using zonemaster.

Zonemaster is a great tool to verify that you have set up your domainservers correctly. You can test it out on https://zonemaster.iis.se/en/

I want my icinga server to this automaticly so i will get a warning as soon something changes, so lets do that. First thing you need to now is that Zonemaster is a tool and is freely available on Github. you can download it and run it on your own machine.

Categories
Linux Network

Start NRPE after openvpn tunnel is connected

NRPE will not start if its server address is a openvpn ip and the tunnel is not yet established when NRPE tries to start. to solve this. create a new systemd file

systemctl -all | grep ovpn
cp /usr/lib/systemd/system/nrpe.service /etc/systemd/system/nrpe.service

Add your tun device to Requires and After. Note you need the systemD name of your tune device. in this case. OpenVPN was configured to use tun ovpn-gwSamuel check systemctl for its correct name. The result should look something like this. Notice the esacped dash sign in the name.

[Unit]
Description=Nagios Remote Program Executor
Documentation=http://www.nagios.org/documentation
Conflicts=nrpe.socket
Requires=network.target sys-devices-virtual-net-ovpn\x2dgwSamuel.device
After=network-online.target sys-devices-virtual-net-ovpn\x2dgwSamuel.device

[Install]
WantedBy=multi-user.target

[Service]
Type=forking
User=nrpe
Group=nrpe
EnvironmentFile=/etc/sysconfig/nrpe
ExecStart=/usr/sbin/nrpe -c /etc/nagios/nrpe.cfg -d $NRPE_SSL_OPT
Categories
Linux

Error unpacking rpm package chkconfig

Trying to update some CentOS servers to in this case CentOS 7.4 i stumbled onto a problem there it was not possible to perform a update on chkconfig.

[root@moln.dalesjo.net ~]# yum update -y
Loaded plugins: fastestmirror
Loading mirror speeds from cached hostfile
 * base: mirror.zetup.net
 * epel: mirror.zetup.net
 * extras: mirror.zetup.net
 * updates: mirror.zetup.net
Resolving Dependencies
--> Running transaction check
---> Package chkconfig.x86_64 0:1.7.2-1.el7 will be updated
---> Package chkconfig.x86_64 0:1.7.4-1.el7 will be an update
--> Finished Dependency Resolution

Dependencies Resolved

====================================================================================================================================================================================================================================================
 Package Arch Version Repository Size
====================================================================================================================================================================================================================================================
Updating:
 chkconfig x86_64 1.7.4-1.el7 base 181 k

Transaction Summary
====================================================================================================================================================================================================================================================
Upgrade 1 Package

Total download size: 181 k
Downloading packages:
Delta RPMs disabled because /usr/bin/applydeltarpm not installed.
chkconfig-1.7.4-1.el7.x86_64.rpm | 181 kB 00:00:00
Running transaction check
Running transaction test
Transaction test succeeded
Running transaction
 Updating : chkconfig-1.7.4-1.el7.x86_64 1/2
Error unpacking rpm package chkconfig-1.7.4-1.el7.x86_64
error: unpacking of archive failed on file /etc/init.d: cpio: rename
chkconfig-1.7.2-1.el7.x86_64 was supposed to be removed but is not!
 Verifying : chkconfig-1.7.2-1.el7.x86_64 1/2
 Verifying : chkconfig-1.7.4-1.el7.x86_64 2/2

Failed:
 chkconfig.x86_64 0:1.7.2-1.el7 chkconfig.x86_64 0:1.7.4-1.el7

Complete!

The problem occured because /etc/init.d was a directory instead of a softlink to /etc/rc.d/init.d/. To fix it, simply do

mv /etc/init.d/* /etc/rc.d/init.d/
rm /etc/init.d -r
ln -s /etc/rc.d/init.d/ /etc/init.d
Categories
Linux Storage

Extended permissions on backup directory

Using rsnapshot to do backups I want to enable some users the availability to easily restore a single file from the snapshot. Problem is that rsnapshot also is keeping the original permissions for each file. To solve this i will create a usergroup called dalesjo-backup and give this group read access to all files in the backup using an Access Control list.

Enable ACL

First you need to enable ACL on your zfs pool in this case zfs-pool-2

zfs set acltype=posixacl zfs-pool-2

If you dont do this setfacl will return the error below.

setfacl: .: Operation not supported

Set Filepermissions

Below I’m setting a default acl giving dalesjo-backup read/execute permissions on all new files. And after that changing all currently existing files to give read/execute access to the same group.

cd /zfs-pool-2/backup
setfacl -Rdm "g:dalesjo-backup:rx" .
setfacl -Rm "g:dalesjo-backup:rx" .
getfacl .

Source: Serverfault

Categories
Linux Network

Extending snmpd with sensor data from ipmitool

Create script

Create a script that returns the data you want to monitor through snmp. the output should be cleaned from whitespaces.

My examples monitor sensor data from ipmi by creating cron script that outputs ipmitool sensor data to  a temp file every two minutes. And then parsing it with snmp_ipmi from github. Cron script below.

# .--------------------------- minute (0 - 59)
# | .------------- hour (0 - 23)
# | | .---------- day of month (1 - 31)
# | | | .------- month (1 - 12) OR jan,feb,mar,apr ...
# | | | | .---- day of week (0 - 6) (Sunday=0 or 7) OR sun,mon,tue,wed,thu,fri,sat
# | | | | |
# * * * * * user-name command to be executed
 */2 * * * * root ipmitool sensor list > /tmp/ipmi_sensor_list

Add script to snmpd

Edit /etc/snmp/snmpd.conf and add your scripts

rouser OP5View

extend "System Fan 1" /usr/lib64/nagios/plugins/custom/ipmi/snmp_ipmi -f /tmp/ipmi_sensor_list -u "System Fan 1"
extend "System Fan 3" /usr/lib64/nagios/plugins/custom/ipmi/snmp_ipmi -f /tmp/ipmi_sensor_list -u "System Fan 3"
extend "System Fan 4" /usr/lib64/nagios/plugins/custom/ipmi/snmp_ipmi -f /tmp/ipmi_sensor_list -u "System Fan 4"

Test

restart snmpd and run the following command to see your snmp data. example output below.

# snmpwalk -u OP5View -A password -a SHA -X encryptionkey -x AES -l authPriv -v3 localhost .1.3.6.1.4.1.8072.1.3
NET-SNMP-EXTEND-MIB::nsExtendNumEntries.0 = INTEGER: 4
NET-SNMP-EXTEND-MIB::nsExtendCommand."test" = STRING: /bin/echo
NET-SNMP-EXTEND-MIB::nsExtendCommand."System Fan 1" = STRING: /usr/lib64/nagios/plugins/custom/ipmi/snmp_ipmi
NET-SNMP-EXTEND-MIB::nsExtendCommand."System Fan 3" = STRING: /usr/lib64/nagios/plugins/custom/ipmi/snmp_ipmi
NET-SNMP-EXTEND-MIB::nsExtendCommand."System Fan 4" = STRING: /usr/lib64/nagios/plugins/custom/ipmi/snmp_ipmi
NET-SNMP-EXTEND-MIB::nsExtendArgs."test" = STRING: hello
NET-SNMP-EXTEND-MIB::nsExtendArgs."System Fan 1" = STRING: -f /tmp/ipmi_sensor_list -u \"System Fan 1\"
NET-SNMP-EXTEND-MIB::nsExtendArgs."System Fan 3" = STRING: -f /tmp/ipmi_sensor_list -u \"System Fan 3\"
NET-SNMP-EXTEND-MIB::nsExtendArgs."System Fan 4" = STRING: -f /tmp/ipmi_sensor_list -u \"System Fan 4\"
NET-SNMP-EXTEND-MIB::nsExtendInput."test" = STRING:
NET-SNMP-EXTEND-MIB::nsExtendInput."System Fan 1" = STRING:
NET-SNMP-EXTEND-MIB::nsExtendInput."System Fan 3" = STRING:
NET-SNMP-EXTEND-MIB::nsExtendInput."System Fan 4" = STRING:
NET-SNMP-EXTEND-MIB::nsExtendCacheTime."test" = INTEGER: 5
NET-SNMP-EXTEND-MIB::nsExtendCacheTime."System Fan 1" = INTEGER: 5
NET-SNMP-EXTEND-MIB::nsExtendCacheTime."System Fan 3" = INTEGER: 5
NET-SNMP-EXTEND-MIB::nsExtendCacheTime."System Fan 4" = INTEGER: 5
NET-SNMP-EXTEND-MIB::nsExtendExecType."test" = INTEGER: exec(1)
NET-SNMP-EXTEND-MIB::nsExtendExecType."System Fan 1" = INTEGER: exec(1)
NET-SNMP-EXTEND-MIB::nsExtendExecType."System Fan 3" = INTEGER: exec(1)
NET-SNMP-EXTEND-MIB::nsExtendExecType."System Fan 4" = INTEGER: exec(1)
NET-SNMP-EXTEND-MIB::nsExtendRunType."test" = INTEGER: run-on-read(1)
NET-SNMP-EXTEND-MIB::nsExtendRunType."System Fan 1" = INTEGER: run-on-read(1)
NET-SNMP-EXTEND-MIB::nsExtendRunType."System Fan 3" = INTEGER: run-on-read(1)
NET-SNMP-EXTEND-MIB::nsExtendRunType."System Fan 4" = INTEGER: run-on-read(1)
NET-SNMP-EXTEND-MIB::nsExtendStorage."test" = INTEGER: permanent(4)
NET-SNMP-EXTEND-MIB::nsExtendStorage."System Fan 1" = INTEGER: permanent(4)
NET-SNMP-EXTEND-MIB::nsExtendStorage."System Fan 3" = INTEGER: permanent(4)
NET-SNMP-EXTEND-MIB::nsExtendStorage."System Fan 4" = INTEGER: permanent(4)
NET-SNMP-EXTEND-MIB::nsExtendStatus."test" = INTEGER: active(1)
NET-SNMP-EXTEND-MIB::nsExtendStatus."System Fan 1" = INTEGER: active(1)
NET-SNMP-EXTEND-MIB::nsExtendStatus."System Fan 3" = INTEGER: active(1)
NET-SNMP-EXTEND-MIB::nsExtendStatus."System Fan 4" = INTEGER: active(1)
NET-SNMP-EXTEND-MIB::nsExtendOutput1Line."test" = STRING: hello
NET-SNMP-EXTEND-MIB::nsExtendOutput1Line."System Fan 1" = STRING: 1274.000
NET-SNMP-EXTEND-MIB::nsExtendOutput1Line."System Fan 3" = STRING: 1372.000
NET-SNMP-EXTEND-MIB::nsExtendOutput1Line."System Fan 4" = STRING: 1372.000
NET-SNMP-EXTEND-MIB::nsExtendOutputFull."test" = STRING: hello
NET-SNMP-EXTEND-MIB::nsExtendOutputFull."System Fan 1" = STRING: 1274.000
NET-SNMP-EXTEND-MIB::nsExtendOutputFull."System Fan 3" = STRING: 1372.000
NET-SNMP-EXTEND-MIB::nsExtendOutputFull."System Fan 4" = STRING: 1372.000
NET-SNMP-EXTEND-MIB::nsExtendOutNumLines."test" = INTEGER: 1
NET-SNMP-EXTEND-MIB::nsExtendOutNumLines."System Fan 1" = INTEGER: 1
NET-SNMP-EXTEND-MIB::nsExtendOutNumLines."System Fan 3" = INTEGER: 1
NET-SNMP-EXTEND-MIB::nsExtendOutNumLines."System Fan 4" = INTEGER: 1
NET-SNMP-EXTEND-MIB::nsExtendResult."test" = INTEGER: 0
NET-SNMP-EXTEND-MIB::nsExtendResult."System Fan 1" = INTEGER: 0
NET-SNMP-EXTEND-MIB::nsExtendResult."System Fan 3" = INTEGER: 0
NET-SNMP-EXTEND-MIB::nsExtendResult."System Fan 4" = INTEGER: 0
NET-SNMP-EXTEND-MIB::nsExtendOutLine."test".1 = STRING: hello
NET-SNMP-EXTEND-MIB::nsExtendOutLine."System Fan 1".1 = STRING: 1274.000
NET-SNMP-EXTEND-MIB::nsExtendOutLine."System Fan 3".1 = STRING: 1372.000
NET-SNMP-EXTEND-MIB::nsExtendOutLine."System Fan 4".1 = STRING: 1372.000

Get OID

Get you oid so you can search from another computer without MIB

snmptranslate -On 'NET-SNMP-EXTEND-MIB::nsExtendOutput1Line."System Fan 1"'

Nagios / OP5 Test

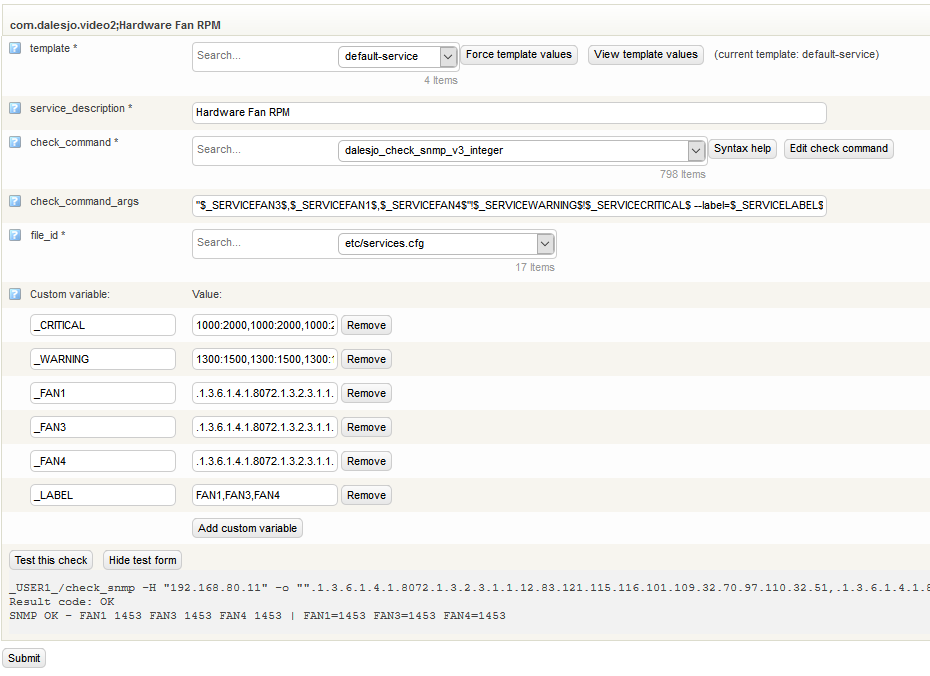
Setup a snmp test in Nagios/OP5 using check_snmp. because the output from the script is strings check_snmp has to do string conversion to integer, which it can if you configure it correctly. The example below does one check_snmp request it returns the value for all 3 fans we configured above. if any of the 3 Fans RPM value is outside of 1300-1500 rpm a warning is generated, if the rpm value is outside of 1000-2000 a critical is generated.

_USER1_/check_snmp -H "192.168.80.11" -o "".1.3.6.1.4.1.8072.1.3.2.3.1.1.12.83.121.115.116.101.109.32.70.97.110.32.51,.1.3.6.1.4.1.8072.1.3.2.3.1.1.12.83.121.115.116.101.109.32.70.97.110.32.49,.1.3.6.1.4.1.8072.1.3.2.3.1.1.12.83.121.115.116.101.109.32.70.97.110.32.52"" -P 3 -U "OP5View " -a sha -A "password " -x aes -X "encryptionkey " -L authPriv -w 1300:1500,1300:1500,1300:1500 -c 1000:2000,1000:2000,1000:2000 --label=FAN1,FAN3,FAN4
Result code: OK
SNMP OK - FAN1 1453 FAN3 1453 FAN4 1453 | FAN1=1453 FAN3=1453 FAN4=1453

How it looks in OP5